Monday, August 31, 2015

Meet the Minnesota Midgit: The Cutest Cantaloupe at MCGA

I love a gardening challenge and for me growing cantaloupes was a new adventure I was curious to dive into.  I had tried in years past with French muskmelons but had no luck getting them to reach full size and ripen.

This season, I selected the variety Minnesota Midget due to its reputation of early ripening and great flavor.  I chose to start my seeds at home because I have never seen these starts offered at my local nursery or hardware store.  

When all danger of frost had passed and the soil temperature was a steady 65F, I planted my starts outside under a 5 gallon water bottle cloche until early July.  I grew two plants in the ground, under black plastic and one in a large black container.  All the plants did well but the one in the container fared the best and produced 5-6 perfect little melons.


These softball-size muskmelons grow on polite three- to four-foot vines instead of taking over your whole garden.  The melons were very easy to grow and carefree, I did however add a cup of organic fertilizer to the planting hole and watered them with fish emulsion once a month for three months as they grew.  The one mistake I made was to over water one of my plants which made the fruit very mushy.  Now I know to water the mature plants with fruit sparingly.


  Here are three Minnesota's next to a supermarket melon. 


 Cantaloupes are ripe when they pull off the vine with ease...no pulling should be necessary. You can also tell they are ripe when they are incredible sweet smelling.  After picking a few melons and placing them in my car, I  immediately noticed the heady fragrance coming from the fruit as I drove home!  As of today August 11, 2015, I harvested the last of my two melons.


The melon were very sweet and had a good flesh to seed ratio.  They are quite thin skinned but easy to eat with a spoon much like a grapefruit half in the morning.  They make for a very lovely breakfast.

Monday, August 3, 2015

Lemon or Cucumber or Both?

I have grown lemon cucumbers for years.  They are an heirloom variety that is believed to have come to the U.S.  in the 1900's.  They are tennis ball sized, yellow in color like a lemon but they do not smell or taste lemony at all.  They are a wonderful size because you can eat the whole thing in one sitting with no leftovers.

Easy to grow and quite carefree, they are vigorous plants that need caging or trellising.  They bear fruits later than the "normal" green slicing cucumbers but taste just as great.  Perfect for slicing, pickling (we make refrigerator pickles out of them), grating into raita and much, much more.  I do notice they have a greater seed to flesh ratio than green slicing cukes but that has not prevented me from growing them at all!


Lemon cucumbers of various sizes, we have 4 plants and harvest 3-6 cucumbers every 2-3 days.  I have harvested golf ball sized fruit and baseball sized fruit as well.

They are very prolific and easy to grow.  Note:  They can be prickly, harvest with gloves or just be careful.  I quickly rub the spines off after I pick them.


Lemon cucumber in comparison to a 7 inch Super Slicer cultivar.  Both make wonderful pickles that are now a summer staple in our household. 


These cucumbers are lovely to look at.  They seeds are soft and delicious, no need to toss them out.  I hope you will try them next season.

Italian Oxheart Tomato

Cuor di Bue means Oxheart in Italian.  This is an indeterminate Italian heirloom that KIS organic donated to MCGA and I was the happy recipient of this hard to find variety.  They produce beautiful 12-oz. fruit have a delicious sweet taste.  They are similar to the shape of a heart and are great for fresh eating or cooking.  I was surprised that the fruit never got red, they remained and orangey-red even when quite ripe.  


Here is the Cuor di Bue next to a ripe peach.  This particular tomato weighed 12 ounces.  


The heart shape was adorable.  My children almost did not want me to cut it up and eat it.


This thin skinned tomato made the best homemade tomato sauce.  The flesh was thick, pulpy and acidic with very few seeds.  Our recipe was super simple, saute 2 smashed garlic cloves in olive oil, add 1/2  C. diced onion,  season with S +P, saute until everything is soft.  Add 4 C. roughly chopped tomatoes.  Cook until soft, add flavorings like basil, oregano, tiny bit of balsamic, red wine or cream to make tomato bisque.  I use a stick blender to puree it directly in the pot.  Simple and delicious.


Epic tomato sauce being prepared!


Cherokee Purple-The Gourmet's Tomato

Cherokee Purple is a cultivar (cultivated variety) of heirloom tomato.  They were “discovered” and named in 1990 by retired chemist Craig LeHoullier and are thought to have been passed down from Native Americans of the Cherokee tribe.  

The vines are indeterminate and vigorous growing up to 9 feet. They benefit from strong staking or caging.  Their fruits average 16 ounces!  These beefsteak tomatoes are purple, brown, greenish brown and mahogany with green shoulders.  They may not be the prettiest dark tomato but they win taste test after taste test all across the country.


I picked my tomatoes when they are almost ripe and leave them on the counter (never in the refrigerator) to fully ripen.  Cherokee purple tomatoes have many color variations so I give them a super gentle squeeze before I pick them.  The stem is often quite thick so I recommend using scissors or pruners to harvest them.


I have a special trick I use with my tomatoes before I harvest them.  I withhold water for 1-2 days in order not to dilute the flavor of my fruits.  We sliced the tomatoes, layered them with fresh mozzarella for the most delicious caprese salad.  This tomato was so sweet it even rivaled the flavor of cherry tomatoes with no hint of acid at all.


This tomato was the biggest one I harvested this year.  I was hoping for a 2 pounder but no cigar this time.  There is always next year!


Wednesday, July 22, 2015

The Tale of Three Beans


Snap beans come in a huge range of sizes and colors, because any immature bean with pods that taste good when “snapped” into pieces is a snap bean. They are classified into two major groups, "bush" beans and "pole" beans. These are called green beans, snap beans, wax beans, butter beans and many more local and regional names.

Bush beans are short plants, growing to approximately 2 feet in height, without requiring supports. They generally reach maturity and produce all of their fruit in a relatively short period of time, then stop producing. Pole beans have a climbing habit and produce a twisting vine, which must be supported by trellises or cages. 

Both purple and yellow wax beans are snap beans with color variations. Purple beans are a bush variety, their color comes from plant pigments called anthocyanins. Anthocyanins are water-soluble pigments that also give red cabbage, purple cauliflower, and purple asparagus their vibrant color. You will notice that they turn green when steamed or boiled. Yellow wax beans are common in bean salads and have a very crisp and waxy bite that is particular to the yellow variety.

The Tale of the Three Beans ends with this….all three are beautiful to look at, all three are delicious and all three are easy to grow and thrive at Marymoor.  Try all three and decide for yourself which one you like the best.


Sunday, July 19, 2015

Pineapple Tomatillo or Ground Cherry?

I was at the Master Gardener Plant Sale this May and purchased a plant I had never seen before called a pineapple tomatillo.   I looked it up on the internet before I bought it and was intrigued by the description.  This plant grows like a tomatillo only it has a denser habit and tastes like pineapple! I am a sucker for anything tropical tasting so I took the plant home with me, hardened it off and planted it at the garden when the danger of frost passed. It is growing well with tiny husks the size of nickles and fruit inside those husks the size of blueberries.  It takes regular water and is not bothered by many pests at tall.  When the husks turn a golden brown they are ready to be picked.  I noticed these tiny fruit tend to drop off the plant as they ripen, the fallen fruit are perfectly ripe and should not be discarded.

As I was munching on the fruit and doing research for this post, I ran across several articles that label this plant as a ground cherry.

I am not sure what I have grown but it is delicious and does taste like pineapple, not many of them make it home as I tend to eat them out of hand as I pick them.  


Friday, July 3, 2015

Water Wise Gardening Guide

I took a look at some local weather history last night and it seems June 2015 has shattered local heat records and lack of rainfall records.  So far, it has been an amazing summer for vegetable gardening at MCGA.  The heat has produced a bumper crop of everything in our garden: cucumbers, beets, beans, peas, broccoli, lettuce and greens, cauliflower just to name a few.  With all the continued heat, hopefully the PNW won’t be headed into the realm of enforced water restrictions this summer. 

Plants are over 90% water.  There are critical periods in which lack of water has an adverse effect on your vegetable crops.  Some of these effects can be mitigated if you can target the timing and amount of water to add.  As a rule of thumb, water is most critical during seed germination, the first few weeks of development, immediately after transplanting (try to fill your planting hole up with water before you put your transplants in and try not to plant or move crops in full sun), and during flowering and fruit production.

Cole crops (broccoli, cabbage, cauliflower, collards, Brussels sprouts, kale, and kohlrabi) need moisture during their entire life span. This is probably one of the most sensitive plant families when it comes to needing consistent watering. Water use is highest and most critical during head development, if consistent water is not given, the plant will be stunted, be very prone to aphid attack, the heads may not form or be very small and/or bolt and flower right away.

Beans have the highest water use of any common garden vegetable.  During blossoming and fruit development, beans use one-quarter to over one-half inch of water per day.  I plant my beans very densely so they can shade one another.

Lettuce and other leaf vegetables need water most critically during head (leaf) development.  For quality produce, these crops require a constant supply of moisture.  If not the greens can become bitter, stringy and they may bolt prematurely.

Onion family crops, (garlic, leeks) require consistent moisture and frequent irrigation due to their small, inefficient root system.  They often fall over because to weak roots, it is best to pull them if this happens.

Potatoes tubers will be knobby if they become overly dry during tuber development.  Potato scab is a common problem when there is insufficient moisture during tuber formation.

Tomato family (tomatoes, peppers, and eggplant) needs water most critically during flowering and fruiting.  Blossom end rot (a black sunken area on the bottom of the fruit) is often a symptom of too much or too little water.  Blossom drop is also a common problem that occurs from lack of water. The tomato family has a lower water requirement than many vegetables and plants are often over-watered in the typical home garden.  Water your tomatoes very deeply; tomato roots can be as long as five feet or more.

Vine crops: cucumbers, summer and winter squash, and assorted melons need water most critically during flowering and fruiting.  Vine crops use less water than many vegetables and are often over-watered in the typical home garden.

Watering wisely has always been a mantra at MCGA and more water wise garden solutions have been implemented throughout MCGA more than ever before.  Hooray!  The #1 way to increase your soil’s water holding capacity is to amend your garden soil with coarse, decomposed organic matter such as compost, leaf mold, manures, straw and more.

In our clay soil, organic matter glues the tiny soil particles together into larger particles, increasing pore space.  This process takes place over time.  This increases soil oxygen levels and improves soil drainage, which in turn increases the rooting depth allowing roots to reach a larger supply of water and nutrients. Another method to add organic matter is to replant the fall garden with a green manure crop such as winter rye or buckwheat.

I use mulches and drip irrigation to conserve water as well and to keep moisture off the foliage to avoid air borne fungal diseases. 

Other water saving techniques are:

Mulches, mulches and more mulch.

Plant in blocks, rather than rows.  This creates shade for roots and reduces evaporation.  Shade cloth is helpful too.

Control weeds that compete with vegetables for water.

Group plants with similar water needs in the same section of the garden for easy irrigation.  Cucumber, zucchinis, and squash, for example, require similar water applications.


Stay cool and let us know what techniques worked for you!

Friday, June 19, 2015

All Hail to the Purple Vegetables

Last winter our family started showing interest in colored cauliflower.  We purchased yellow cauliflower, green cauliflower and orange cauliflower all through the 'dark months.'

In early spring we decided to try our hand at growing purple cauliflower.  My daughter loves cauliflower and she helped prepare the beds, we added compost, egg shells, lime and leaf mold to our garden beds   (Brassica plants like a higher ph than most garden plants, it also thought that lime helps mitigate a terrible fungal disease called club root.)  

Cauliflower was brought to England by Flemish weavers in the mid-1600s.  Purple cauliflower is a heritage variety that comes from either Italy or South Africa. Its true wild origin is not quite known, though its color is naturally occurring and is not due to scientific manipulation or breeding.


Anthocyanins are water-soluble pigments that also give red cabbage, purple cauliflower, and purple asparagus their vibrant color. Purple plants are not only beautiful to look at they are nutritious as well.  Most of the time we boil our cauliflower in water and that gorgeous color fades away much to the dismay of the kids.  Tonight however, we roasted the dinner vegetables and were thrilled when the cauliflower retained it fabulous hue.  On a side note, if you boil your cauliflower and dress them with lemon and olive oil, the cauliflower turns bright pink!


This is the roasted cauliflower.  We seasoned it with salt, pepper, garlic and olive oil.  Simple and perfect.


This is the little fella growing away in our garden, we planted four and so far three are producing nice tight heads.  The cultivar is Graffiti.

Tuesday, June 9, 2015

Pest Spotlight #3: Leaf Miners

Leaf miners are a group of insects (sawflies, beetles, flies and moths) whose larvae live in the tissues of leaves and 'mine' their way through the leaf of the plant.  Although visually unattactive, they do no real damage to the plant. 

 The damage they do is often mistaken for some other problem or disease such as a fungal disease, to be sure it is a leaf miner, tear the affected leaf in half and hunt the larvae down. If you spot a leaf miner on your plants, you can tear the leaf off and discard it or pinch the larvae and kill it.  

Pesticides don't work well in regards to leaf miners because they cannot penetrate the leaf barrier.  Floating row covers can prevent the adults from laying eggs.Check your leafy crops for frequently for egg and hand crush them.

See Below for leaf miner damage and larvea. The top two are serpentine leaf miners and the third is a blotch leaf miner.


Tuesday, May 26, 2015

Pest Spotlight #2: Cucumber Beetle

Cucumber beetles do not only attack cucumbers, the larvae and adults attack asparagus, broad beans, eggplants, potatoes, certain fruit trees, tomatoes, peas, squash, corn (a favorite), cucumbers, potatoes, fruits, and melons.

Cucumber beetles damage cucurbit crops in at least three ways. First, their feeding directly stunts plants and, when flowers are eaten. Second, cucumber beetles transmit bacterial wilt disease. Once bacterial disease has entered the plant, there's very little that you can do the bacterium spreads rapidly through the vascular system of the plant, creating resins which restrict the movement of water and nutrients. This causes the plant to wilt and die, sometimes in as few as seven days. Third, adults scar the fruit reducing its marketability.

Begin cucumber beetle control as soon as seedlings emerge. Cultural controls include crop rotation, the use of transplants rather than direct seeding, row covers, trap cropping, mulching for predator conservation, the use of reflective plastic mulches and choosing resistant varieties.

Kaolin clay is reported to act by making cucurbit crops unattractive to cucumber beetles and because it gums up the beetles’ antennae and otherwise irritates them.


Cucumber beetle eggs on the underside of a leaf,  Hunt for them at night and destroy them.


These are the spotted and the striped cucumber beetles.


Cucumber beetle damage


Thursday, May 21, 2015

Pest Spotlight #1: Flea Beetle


Many species of flea beetles are found throughout the United States and there are many species of flea beetles which attack numerous plants, but vegetable crops are most susceptible to these pests. 

Flea beetles are so named because of their ability to jump like fleas when bothered. The beetles are small and shiny, with large rear legs. A voracious pest, they will damage plants by chewing numerous small holes in the leaves As flea beetles feed, they create shallow pits and small rounded, irregular, holes (usually less than 1/8th inch) in the leaves, resulting in a shot hole appearance. 

When populations are high, flea beetles can quickly defoliate and kill entire plants. They feed most on hot sunny days and attack a wide variety of plants including beans, cabbage, corn, eggplant, potatoes, peppers, tomatoes, lettuce and most seedlings.


Flea Beetle Control:

Remove garden debris to reduce overwintering sites.

Place floating row covers on seedlings and leave in place until plants are old enough to tolerate beetle damage.

Plant a sacrificial crop, such as mustard and radish near garden areas to draw pests away.

Place yellow sticky traps throughout garden rows every 15 to 30 feet to capture adults.

Beneficial nematodes applied to the soil will destroy the larval stage, reducing root feeding and helping to prevent the next generation of adults from emerging.

Diatomaceous earth can be dusted over plants to control the number of feeding adults.  Wear a mask when doing this, also do not apply on a windy day.

If pest populations become intolerable, spot treat with botanical insecticides as a last resort.  (Like Neem oil)


Saturday, April 25, 2015

True or False Quiz #1

As a Master Gardener, part of my continuing education is to complete quarterly quizzes which I get credits for. The original quiz was 30 questions and worth 2 points, I have edited it to make it more relevant to community gardens.  Try your hand at the questions, answers will be posted next week.  Have fun!

1. Applying mulch to bare soil areas is one way of using water efficiently. __X__ T  ____F

2. One advantage of gardening in raised beds is the soil is less likely to be compacted by walking on it. __X_T  _____F

3. Increasing the organic matter in soil improves its water-holding capacity. _X_T  _____F

4. Nitrogen, phosphorous, and potassium are macronutrients. ___X__T  _____F


5. Working garden soil when it is very wet harms soil structure. __X__T  _____F

6. Before deciding how to control an insect pest, it is important to know its life cycle.
__X_T  _____F

7. Low pH is an important factor in the growing of blueberries. __X__T  _____F

8. The beer used to attract slugs to a death by drowning is considered a pesticide.
__X__T  _____F

9. In a vegetable garden, it’s important to have trees nearby to provide shade during days of extreme heat. _____T  __X_F.

10. Most soil nutrients needed for plant growth are available in a soil pH range of pH 6-7.
__X__T  _____F

-Gia


Monday, April 13, 2015

To Till or Not to Till, That is the Question

There are many reasons why gardeners till their soil before planting; historically the reasons for tilling are to remove weeds, loosen and aerate the soil, and incorporate organic matter such as compost or manure into lower soil layers. Others gardeners till their gardens out of habit, because they love fluffy soil in the spring; they saw their parents or grandparents tilling their gardens so they do the same.


Good soil is the foundation of every garden. In each tablespoon of healthy garden soil there are scores of living microorganisms. These microscopic creatures all serve a valuable purpose. They acquire nutrients from the soil, passing them along to plants in exchange for carbohydrates, suppress disease and break down soil organic matter to help build fertility. This delicate, complex structure of life beneath the soil’s surface is fragile and it is important that we disturb it as little as possible. Leaving soil unturned means the fragile soil web in the soil remains intact and can function at its prime. 


With ‘no-till’ gardening, once the bed is established the surface is never disturbed. (I have to admit, I personally like to till newly formed beds and planting spaces but I only do this once and then never again.  When planting in raised beds or pots, I of course do not till.)


When no-till techniques are in place, existing weeds aren't turned under as they are with tilling; instead, they’re smothered with mulch. By adding material in layers, the underlying soil remains spongy, making it easier for young roots and newly planted seedlings to work through the soil, this is similar to the way soil is formed in nature. Tilling brings viable weed seeds to the surface and enables them to germinate, the mulches no-till gardeners use bury the seeds deeper where they remain dormant.


No-till methods also offer increased protection from soil erosion and can cut down on irrigation needs because of the heavy use of mulches.  While gardener may want to ‘dig in’ soil amendments, digging moves surface organic material deeper, where there is less oxygen to support the decomposition of this material. Amendments such as compost, manure, peat, lime and fertilizer are ‘top dressed’, i.e. added to the top of the bed where they will be pulled into the subsoil by watering and the activity of subsoil organisms.


Over time, the mulch layers you keep adding will help loosen up the clay soil.  When you are ready to plant in the spring, push aside the mulch layer where you want to put your seeds or starts.


Good luck and happy gardening!

-Gia

Monday, March 30, 2015

Slugs, Moles and Voles

Gardening at MCGA is wonderful.  We have so much space to work with I believe we are quite spoiled; we also have full sun which is every gardeners dream. Having the great outdoors at our fingertips means we also have critters of all shapes and sizes at our front door.

This garden post talks about plant pests.  After you have removed all the weeds and grass from your plot, amended it with all the good stuff you have at your disposal, it will be time to plant and thus time to deal with pests.

There are many ways to think about these creatures that live at the garden and oftentimes in our plots,  here are a few:

  (1) They exist, they are a part of nature thus part of the ecosystem of the garden and we must live with them.  We plant enough for ourselves and the let the pests do what they were born to do.  We pick off damaged leaves, removed damaged plants and replant what they take.   

(2) They exist but must be controlled organically with row covers, diatomaceous earth, neem oil,  beer, iron phosphate, lures and other organic methods. We do what is organically possible to curb the taking of too much of our food and spend some energy and expense warding off pests.

(3)  We wage an all out war against these critters, all of them: moles, voles, slugs, moths, beetles, flies, maggots, wasps, worms, flea beetles, deer, birds, weevils, aphids, am I missing any?  I must admit I have tried this and it gets very, very expensive.  The amount of stress I felt trying to accomplish this task was robbing me of my enjoyment of gardening.

I see-saw between all three ways of approaching pest problems depending on what plant they are attacking, how dear that plant is to me, what time of year it is and how much energy I have at any given time to deal with them.  Most of the time, I tend to fight the good fight against weeds more than anything.


Last year, every time my bean plants sprouted, they were immediately topped and relived of all their leaves by rabbits.  My garden consisted of bright green stems for weeks.  I looked around for holes in my fence, planted more beans and in time, the bean plants got a bit bigger and the rabbits left them alone.


The cute little critters below are rabbits.  I found and photographed these babies last year at the garden.  I had some plastic fencing around my garden and they chewed through that, I put some 1 inch chicken wire fencing up but the little babies can easily sneak through those little holes.  They do eat up a great many, many starts but they are easy to control and deter with fencing and even row covers.  I even used giant cabbage leaves to cover up new starts I had planted.


Enemy #1 are slugs!  I took this photo two days ago on a kale plant that overwintered from last year.  Can you find the 9-10 slugs on this plant?

They start out small and it's the smaller ones are the ones that do the most damage.  They can defoliate a veggie start in one night.  Remember they have all night to feast on your veggies. The telltale slime trails let you know slugs have been visiting your garden.  Slugs are very agile and athletic mollusks they can climb to the tops of many mature plants as well.  Sluggo or another brand name organic slug bait are acceptable to use at MCGA.  Beer traps are also effective, slugs love the smell of the yeast.


This is a vole burrow in clay soil, because the soil is firm and compacted, the hole is easy to see.  Voles are not solitary animals and where is there is one, there is a family of them.


This is a vole hole in my garden.  In good soil, the vole hole is often well hidden.  Signs of damage to plants and roots include wilting of the entire plant and gnaw marks on root crops.  Sometimes the hole reveals itself during watering, a large 'sinkhole' may develop in a matter of seconds at the site of a burrow or run.  Voles are called field mice, they look like mice with shorter, stumpier tails.  I try to thwart them by adding hardware cloth to the bottom of my raised beds, this helps but they also spend part of their time above ground.  You cannot win them all.


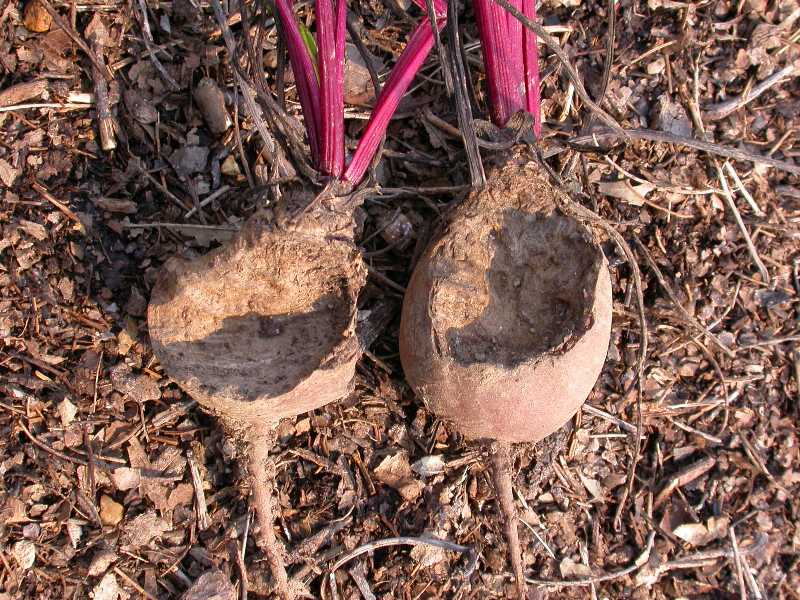
This is vole damage to beets, they like all manner of plant matter, just the other day I was pruning my blueberry bushes,  One bush was slow to bud and upon closer examination, the entire trunk was girdled, chewed to death basically, and the plant just flopped over.


This is a mole hill.  Moles only make hills, not holes.  They run along tunnels and eat worms and grubs, they are carnivores, they do not eat plants.  Their burrowing however can disturb roots and therefore adversely affect plants.  I particularly do not like it when they unearth soil onto my wood chip paths.  The new soil makes a great growing ground for weeds!  They are solitary animals and sometimes they just go away on their own to explore other garden plots, sometimes they visit the same tunnel in the same plot over and over.

I do not recommend trapping for moles or voles.  We have many beneficial animals that live at the garden like a black footed weasel (who likes to eat moles and voles and baby rabbits),  to accidentally trap him would be unconscionable. Birds might also be attracted to traps and to lose even one bird in a trap would be sad.  Avoid all traps please!

Last but not least, we have deer that come through the garden.  Deer are seldom a problem, they nibble here and there, leave some nutrient rich droppings but don't do too much damage.  I let them nibble at my raspberry brambles but they seldom touch the fruit.  If you have a garden fence and you notice tips of plants have been nibbled, often deer have visited your garden.

I over plant (plant more than I can eat) for three reasons. I know pests will eat some of my produce, I like to donate produce to Hopelink and I love to give veggies away to my garden neighbors.  Last year I gave away over 20 eggplants needless to say, I have more than enough to eat.


Sunday, March 15, 2015

Seed Starting Greens Indoors -UPDATE


These are my kale and salad greens after 4 weeks in the house, I moved them into 4 in pots in a little cold frame on my balcony.  I will keep them in the cold frame for 2 more weeks then out of the cold frame for another week before planting out at the garden.  REMEMBER, starts that you buy at the grocery store, nursery, or hardware store may not have been hardened off sufficiently.  It is best to harden them off at home for an additional time just to be sure.  Plant them in your garden on a rainy or cloudy day with a small handful of organic plant food and they should grow well for you for the rest of the season.


Friday, March 13, 2015

Gina and Rob's Winter Larder

Gina and Rob, our esteemed registrars have been gardening intensively in their plots.  They store much of what they harvest and here is a quick narrative and inventory of what they are eating from their winter larder.

As we continue to enjoy our fresh garlic supply, I look forward to my currently growing garlic that had been slumbering since the fall covered by a bed of leaves. I briefly recall what fruits of the 2014 MCGA  season am I still eating now in March 2015...

I just dug up some potatoes in mid-February that had been winter stored (left right in the ground) where they grew last summer - and they are yummy!
  
I have some frozen rhubarb that is ready to be made into rhubarb preserves/jam.

Ready for use, I still have tons of fresh, organic garlic (my husband often eats 5 cloves of freshly-baked garlic on toast each day!).

We have many freshly-picked late-summer tomatoes now canned in glass jars, ready to be made into a flavorful spaghetti sauce.

From the freezer, I just cooked some of my frozen Swiss chard that became the main part of a hearty soup.

I still have carefully stored delicata winter squash that's ready for quick cooking in the oven or microwave...

Cilantro seeds are ready to be crushed into coriander, but might become this year's cilantro plants if I plant them in the soil.

My dehydrated celery, onions, and yellow squash slices are being used in soup making this winter.

I am already picking fresh chives and Chinese garlic chives straight from the garden!

My frozen shredded zucchini is just waiting to be used in soups and zucchini bread...

As you plan your gardens, consider what plants you'd like to grow and what plants you would like to eat so that you can enjoy their bounty in the spring, summer, fall and winter... it took years to figure it out, but year by year there was more that we could can, freeze, dehydrate and preserve.

This Saturday, March 14th, I will drive to Seattle to obtain from the Seattle Tilth Plant sale most of my organic vegetable starts.  I have orders from a couple of my gardening friends to get them broccoli starts in particular.  

They have lots of variety all in one place, they have 3 free classes on gardening.  They wrote my favorite reference book specifically written for this climate:  Maritime Northwest Garden Guide, 2014 ($16.95 plus tax is about $20) with month by month listing of what to plant as seed/start and what particular varieties do well in the Pacific Northwest.  This is the book to own if you are going to own a single gardening book= true advice from Patty (our gardening neighbor) 3 years ago.  If you would like me to pick up a book and not to have to pay for shipping, email me at  Rob.Gina5@gmail.com

Monday, February 23, 2015

Easy Ways to Extend Your Gardening Season

Spring seems to have come early to the Pacific Northwest.  I heard someone mention we are 10 weeks ahead of schedule. Many gardeners are itching to get their seeds and starts into the ground.  I was at PCC in Redmond today and they already sellling starts like herbs, kale, strawberries and greens.  You CAN begin gardening now IF you take precautions and protect your crops from frost and cold overnight temperatures.

Quick reminder:  The water does not get turned on until the last frost date which in our area can be as late a April!

Here are some examples of ways to extend your season in Spring and in the Fall:

High tunnel

High tunnels are essentially small green houses, they are called high tunnels because there is usually a door that one can walk into and most of the time you can stand up in a high tunnel.   I would love to have a mini greenhouse like this but am going to shelve that plan for when I have a large enough space in my backyard for it.


Low Tunnel

Low tunnels are perfect for p-patch gardening.  They are called low tunnels because usually one cannot walk under them.  They can be installed into garden beds or straight into the ground. The supports you use for your low tunnel can vary, PVC pipes are used as well as electrical conduit (this has to be bent with a conduit bender before use) or you can purchase lightweight metal supports to hold up your covering(s). Low tunnels are easy to disassemble as the weather warms up.

Plastic film (the thicker the better) and garden fabric can both be used as covers.  Both have advantages and disadvantages:  on super sunny days the plastic film may get too hot and your plants inside may burn, on rainy days they will keep the rain off but then you will have to water your plants inside, which may involve rolling up one side of the low tunnel to access the plants.  The garden fabric is more breathable, it allows air and rain to your plants but it is a fabric and tends to rip more easily than they heavy duty plastic film.  Both methods are great to retaining heat but also for excluding outside pest, they both however INCLUDE inside pests like slugs and snails.  Be sure to bait for slugs or pick them off in the cool of the evening.


Cold Frames

Cold frames are a wonderful place to start seeds and overwinter plants.  They are usually made from wood and glass or wood and plastic sheeting. There are many cold frames plans on the internet available. Oftentimes cold frames are heavy because they are mostly made of wood, find a good study place to keep them and they will protect your plants for many seasons to come.  Small and lightweight cold frames are available for sale but they are often flimsy, you will have to try them out and decide if they are worth the assembly time and cost.

Keep in mind that a cold frame is smaller in area than many low tunnels and it can get very hot in there.  It is suggested that you install and automatic vent  opener that opens the top pf the cold frame on a particularly warm day.  See photo below, this vent opener will save your seedlings and plants from really baking in the sun.


Cloches

Cloche is French for 'hat', In the garden, cloches are anything that protect your plants and gives them extra warmth.  One can use glass cloches, upturned liter bottles, milk cartons and 5 gallon water containers.  Remember to drill ventilation holes and secure lightweight plastic cloches or they may blow away in the wind.

I use 5 gallon water container and I think it is a great way to recycle.  Beware that it will get hot in there, Watch your plants carefully to see if it might be getting too warm under the cloche.  As you prepare to take the cloche off, make sure you harden off the plants that have been protected underneath.  Gradually, expose them to full sun, wind and nighttime temperatures for 7-10 days before you completely take the cloche off and leave them to fend for themselves.


There are many, many, other season extending products on the market, It is a great idea to walk around the garden, chat with your neighbors and get their opinions of what works for them and might be convenient for you.

Happy Gardening!

-Gia


Tuesday, February 3, 2015

Get to Know Your Asian Herbs

I almost titled this blog post, Get to Know Your Vietnamese Herbs but realized quickly that
 many Asian countries value these herbs.  I was introduced to all the herbs below through Vietnamese cuisine.  Both of my parents were born and grew up in Vietnam even though we are ethnically Chinese.  We grew, sold and ate these greens daily.

Fresh herbs are essential to Vietnamese cuisine; their flavors and perfumes enliven
countless foods. Raw leaves are tucked into rice paper rolls, dropped into hot soups, mixed into cool salads and noodle bowls, stir-fried other vegetables and meats.


(Click on the names of the herbs below to see more information on them.)


Spearmint is must for pho as well as fresh Vietnamese summer rolls.  Beware of these very prolific plants that grow anywhere.  Their very large roots require containment in a large pot for the best harvest.  


Called Ram Rau in Vietnamese, this herb is used is many, many dishes.  It is a weed in the tropics and very invasive.  Grow in a container with access to lots of fresh water, do not allow to dry out.  It is hard to find seeds for this plant.  Visit an Asian market and grow this herb from cuttings.


Garlic chives are great stir fried in many different dishes.  My favorite way to eat them is in an omelette.  Very easy to grow from seeds and starts, needs no special care.  They are essential in pot stickers and/or dumplings of all sorts.


This fragrant herb is delicious when stir fried with clams and black bean sauce, my dad's specialty.  Easy to care for and easy to grow.


Another delicious herb used in pho and noodle bowls. It is a slow growing, very tender annual and must be kept away from frost.  Beware the spiky seed heads when they flower.  Eat only the leaves and slice them into thin ribbons.


This adorable plant is a garden thug, grow in containers to keep it under control.  Used in many, many dishes, can be eaten raw or cooked.  My mom uses this in summer rolls.


-Gia